Surface Profilometry

Surface Profilometry

Technique:

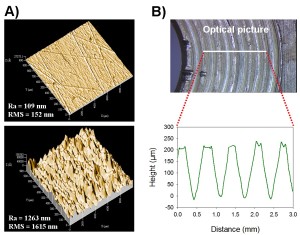
A) Surface morphological images showing parts of a metal surface having different wear (roughness) and B) a profile showing a thread having a pitch of ~0.7 mm and a height of 0.2 mm.
Surface Science Western has a mechanical stylus surface profilometer with the stylus comprising a tungsten wire with a diamond tip (radius ~ 2 µm) embedded at its apex. The contact force (usually a couple of milligrams) between the tip and the sample surface is sensed by a capacitance displacement sensor. By maintaining a constant contact force, the feedback system adjusts the position of the tip according to the height of the surface scanned, thus generating a profile of the surface.
With a noise level of a couple of nanometers and three height ranges (13, 131 and 1048 µm), our profilometer allows us to measure height differences from 5 nm to 1 mm. The instrument can handle samples as large as 8 inches in diameter and as heavy as 5 lbs.
The applications of the instrument cover roughness and waviness estimation and step height measurements. By scanning a series of tracings, one can also obtain a 3D topographic image of the surface, from which any scan lines can be isolated for analysis.
Instrument:
KLA-Tencor P-17 Surface Profiler
A profile obtained on a PTB traceable height standard of 21.9±0.8 nm (TGZ1_PTB), resulting in a step height of 21.7±0.2 nm.

System Capabilities:

  • Roughness quantification for surface finishing evaluation
  • SIMS crater depth measurement
  • Thickness measurement for thin metal and polymer films
  • Radius of curvature measurements
  • 3D surface morphology for detection of defects and corrosion and general surface imaging

A profile obtained on a NIST traceable roughness standard of Ra=0.970±0.025 µm (SRM 2074 S/N 1018), resulting in Ra=0.967 µm. The average roughness estimated over several spots on the standard is Ra=0.966±0.002 µm.

Selected Applications in Industry:

  • Monitoring of corrosion growth on metals
  • Measurement of thread pitch of a screw (millimeter scale)
  • Wearing on a steel modelling device (variation in roughness on different areas)
  • Membrane and fabric surface 3D morphology imaging
  • Reverse engineering of brightness enhancement films
  • Counter top defect imaging
  • SIMS sputter rate estimation